Before you start
What you need, and what the steps are
You need three things: the name of an item you want to buy (for example “iPhone 13” or “Dyson V11”), the suburb or city you want to search from, and a card for the free trial. You do not need a Facebook account, and nothing needs to stay switched on at home.
- Choose a plan and start the 3-day free trial, on the web or in the iPhone app.
- Click the link in the confirmation email we send you.
- Tell the welcome wizard your home suburb and time zone.
- Write your first watchlist and test it.
- Choose where alerts go: the iPhone app, a Discord channel, the dashboard sound.
- Wait for someone to post a match. We usually find it within a minute or two of it appearing on Facebook.
1. Choose a plan and start the trial
Every plan has the same alerts, the same checks and the same tracking tools. The difference is how many watchlists you can run at once and how often each one is checked.
| Plan | Price | Watchlists | Each watchlist is checked every | Your fastest watchlist |
|---|---|---|---|---|
| Basic | US$14.99 a month | 1 | 30 minutes | 30 minutes |
| Standard | US$39 a month | 5 | 5 minutes | One watchlist can be checked every 3 minutes |
| Pro | US$79 a month | 10 | 3 minutes | One watchlist can be checked every 1 minute |
Paying yearly costs 20% less. Every plan starts with a 3-day free trial.
Which plan to pick. If you are not sure, start on Standard. Five watchlists is enough to try a few items at once, and you can move up or down later from Settings, then Plan & billing. Pick Basic if you only ever want one item watched and do not mind a 30-minute gap between checks. Pick Pro if you are competing for fast-selling items like graphics cards or popular phones, where the 1-minute watchlist matters.
Signing up on the web
- On the homepage, click Start your free trial and pick a plan.
- You are taken to Stripe, our payment provider. Stripe asks for your card details now so the plan can continue after the trial. Nothing is charged until the trial ends.
- After the payment page you land in the welcome wizard (step 3 below).
Your trial runs for exactly three days from the moment you sign up. If you sign up on a Tuesday at 3 pm, it ends on Friday at 3 pm. We email you the day before with the subject Your Outpost trial ends tomorrow. If you cancel before the trial ends, from Settings, then Plan & billing, nothing is charged, and your alerts keep running until the trial finishes. If you do nothing, the plan you chose starts and the card is charged.
Signing up on the iPhone
- Install Outpost Alerts from the App Store.
- Open it, create your account, and pick a plan. The App Store starts the trial and shows the price in your own currency.
- Allow notifications when the app asks. That is how alerts reach your phone.
- Set up your first watchlist in the app.
Because Apple handles the subscription, you change or cancel it on the iPhone, not on the web: open the iPhone Settings app, tap your name, then Subscriptions, then Outpost Alerts. Inside the app, Settings has a Manage subscription button that takes you to the same place. If you have reinstalled the app or got a new phone, tap Restore purchases in the app's Settings to pick up your plan again.
One account, both places. Whether you signed up on the web or the iPhone, it is one account. Log in on the other one with the same details and you will see the same watchlists and alerts. The only thing that stays with where you signed up is billing: a plan bought on the iPhone is changed on the iPhone, and a plan bought on the web is changed on the web.
2. Confirm your email
After you sign up on the web we send an email with the subject Confirm your email for Outpost Alerts. Click the link in it. Until you do, a banner stays at the top of the dashboard asking you to confirm.
Confirming matters because this address is where we send your trial reminder, password reset links and replies from support.
If the email has not arrived:
- Check your spam or junk folder. Search for “Outpost”.
- Open the dashboard and use the send a new link option on the banner.
- Check the address under Settings, then Account. If you typed it wrong, fix it there and send the link again.
If you signed in with Google or Apple, you can also set a password later from Settings, then Password. That lets you log in with your username or email as well.
3. The welcome wizard
The first time you open the dashboard, a short wizard asks for the things every watchlist needs. It has three screens.
- Where you are
Type your home suburb or city and pick it from the list, for example “Parramatta, NSW” or “Austin, TX”. Choose your time zone. The suburb is pre-filled into every watchlist you create, so most of the time you only type the item you want. The time zone sets quiet hours and the times shown on alerts.
- How you found us
One tap. It helps us know where to spend our time.
- Your first watchlist
Written as a sentence, the same way the watchlist editor works (next section). The button at the end says Create watchlist and start my outpost. Searching starts the moment you press it.
If you closed the wizard early, nothing is lost. Open the Watchlists tab and press Create Watchlist. You can also change your home suburb later under Settings, then Watchlist defaults.
After the wizard, a short tour points out the main parts of the dashboard. You can run it again any time by pressing the Tour button in the top right corner.
4. Your first watchlist
A watchlist is one search that runs over and over. You write it as a sentence, and each highlighted part can be changed by clicking it.
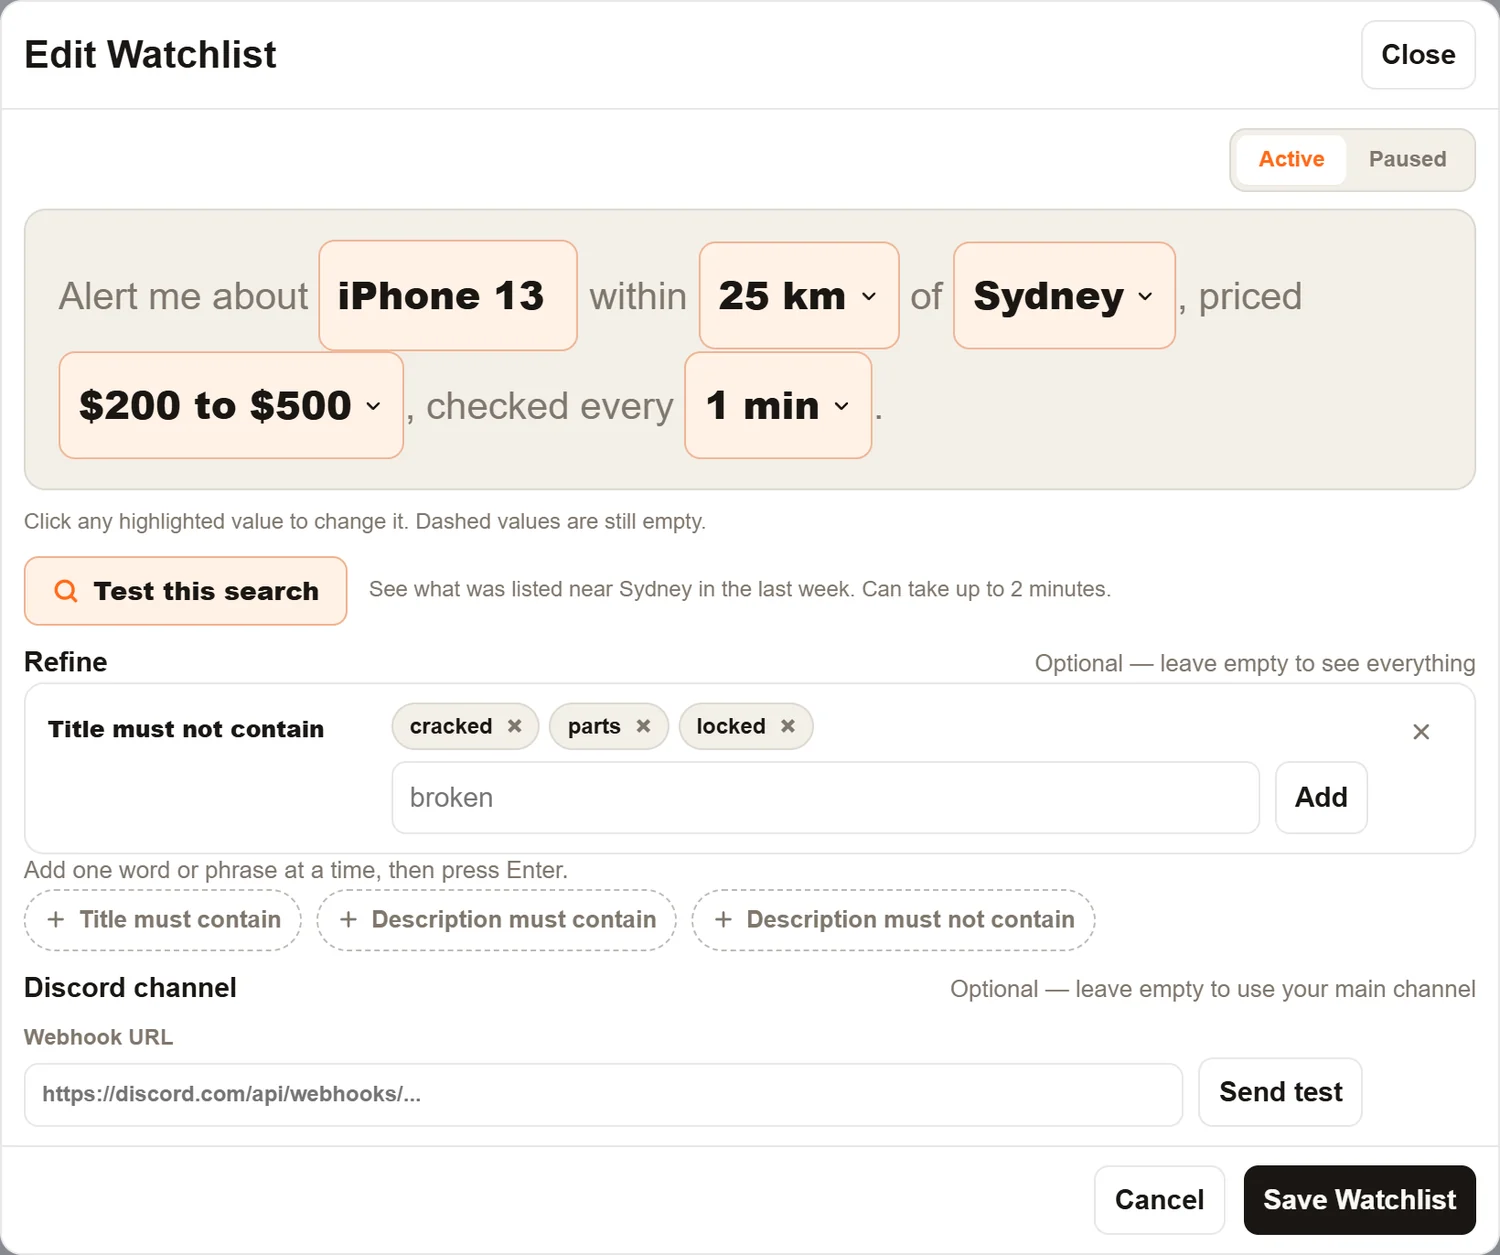
- Alert me about… the item, written the way sellers write it. “iPhone 13”, not “phone”.
- within… the distance from your location, 5 to 500 km (3 to 310 miles).
- of… the suburb or city to search from. Your home suburb is already filled in.
- priced… a lowest and highest price. Leave both empty to see everything.
- checked every… how often this watchlist is searched. The choices depend on your plan.
Some good first watchlists, to give you a feel for it:
| Item | Distance | Price | Why it works |
|---|---|---|---|
| iPhone 13 | 25 km of your suburb | $200 to $500 | A specific model with a clear price range. Add “cracked” and “parts” as words the title must not contain. |
| Dyson V11 | 40 km | Under $300 | Sellers always write the model name, so the search is precise. |
| RTX 4090 | 100 km | $800 to $2,000 | A rarer item, so a wider distance and a lowest price that removes fake $1 listings. |
| Herman Miller Aeron | 60 km | Under $600 | Brand plus model. “Office chair” would return hundreds of chairs you do not want. |
Before you save, press Test this search. It runs a real Facebook Marketplace search for your sentence and shows what was listed in the last week. It can take up to two minutes, so keep the screen open.
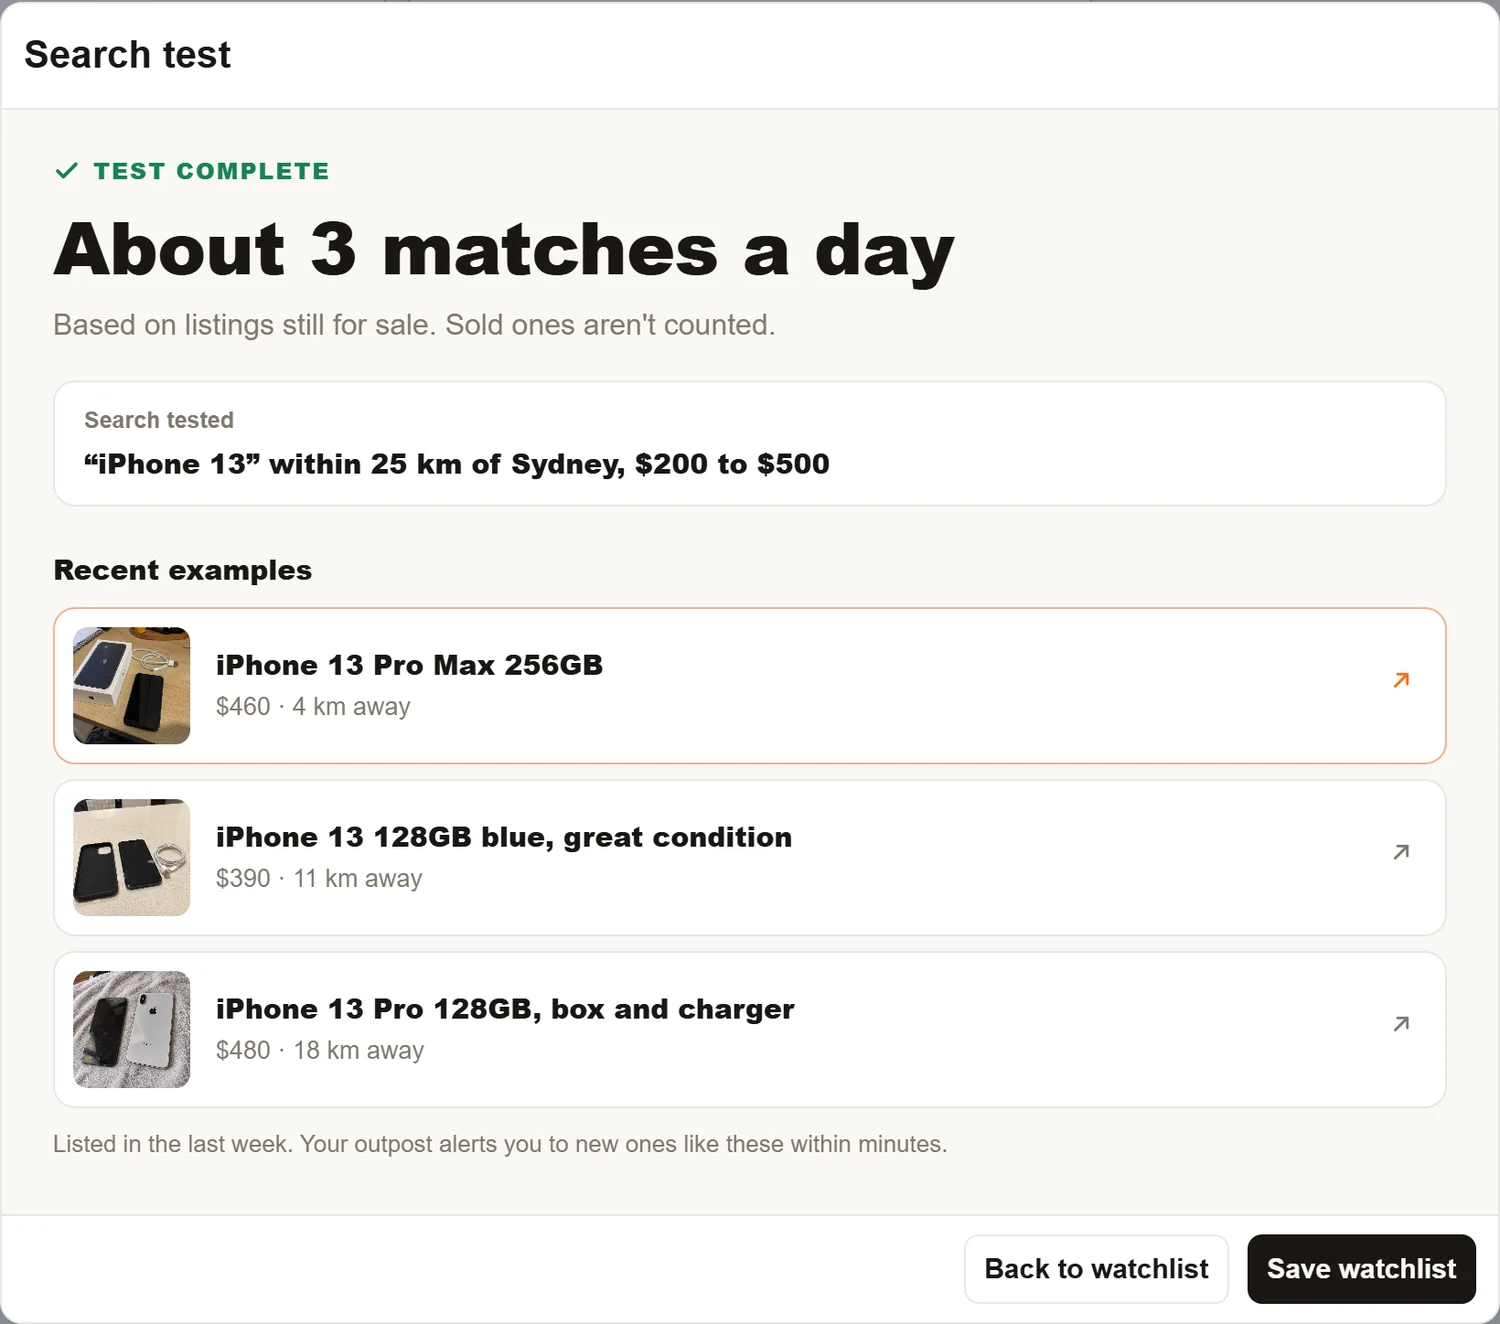
If the examples are the right item, press Save watchlist. If they are the wrong item, or the test says nothing was listed nearby, go back and change the words or widen the distance. The full guide to getting a watchlist right, including the Refine filters, is Writing a watchlist that works.
5. What happens in the first hour
This is the part people most often ask about, so here it is in detail.
First, you see what is already listed
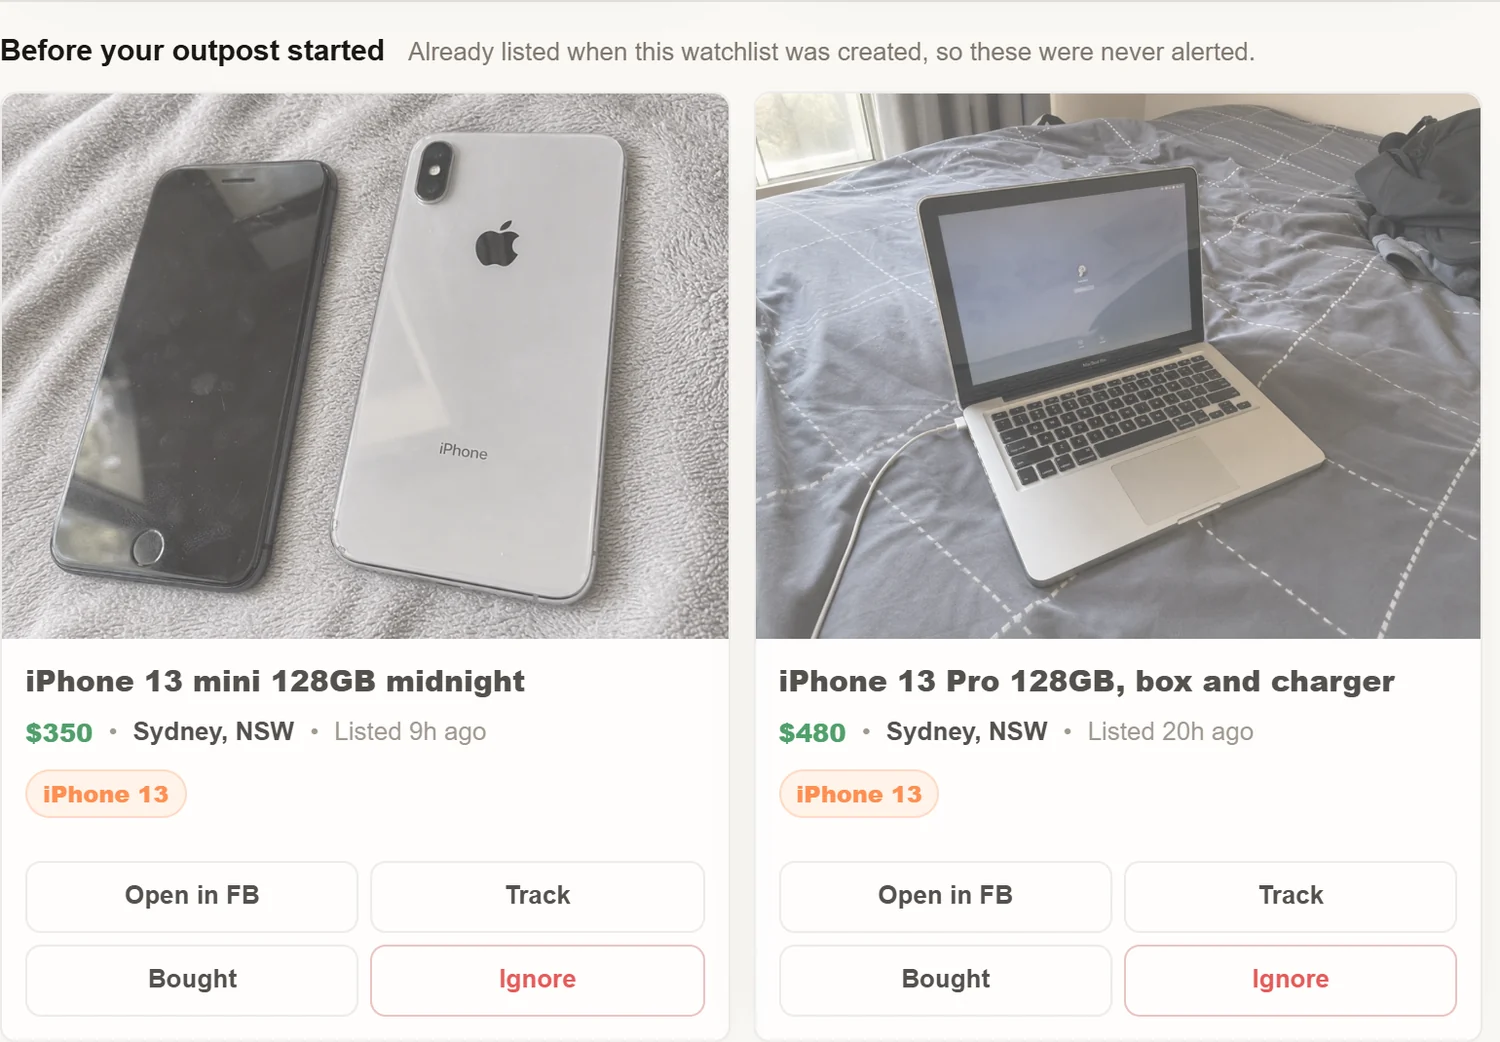
The first check reads everything matching your watchlist that was posted in the last 24 hours. Those listings appear in the Alerts tab in a section called Before your outpost started, shown slightly greyed out. They are there so you can see what the watchlist catches, and you can open, track or buy them like any other listing.
They are not sent as alerts. No push notification, no Discord message, no sound. They were already up before you started, so you were not going to be first to them.
Then, live alerts start
From now on, every search looks for new listings. Here is what happens to one, on a watchlist searched every 3 minutes:
| Time | What happens |
|---|---|
| 9:00 | A seller presses Publish on an iPhone 13 in your area. Facebook's “listed” clock starts here. |
| 9:00 to 9:07 | Facebook reviews the listing. It is not in Marketplace search yet, so nobody can find it by searching and no alert app can see it. |
| 9:07 | The listing appears in Marketplace search. This is the first moment it can be found. |
| 9:08 | We find it, check it really is an iPhone 13 and not a case or a charger, and send the alert. It says Found in 1 minute. |
| 9:08 | You open it on Facebook, which says listed 8 minutes ago. |
So you hear about a new listing a minute or two after it could first be found. Facebook's listed time will usually say 8 or 9 minutes by then, because it also counts the minutes Facebook spent reviewing the listing, when nobody could find it. How fast we find new listings explains this in detail, with the numbers for each plan.
How long until the first one?
It depends entirely on how often people post your item near you.
- A popular item in a big city (iPhones in Sydney, PS5s in Melbourne): usually within the first hour.
- A specific item in a medium city (a particular office chair, a particular graphics card): often a few hours, sometimes a day.
- A rare item, or a small town: it can be days. The watchlist card will say Rarely listed so you know this is normal and not a fault.
The test result from step 4 is the best guide. “About 3 matches a day” means you should see something within hours. “Nothing listed nearby lately” means you may wait a long time, and it is worth widening the search.
How to know it is running

The green Active chip in the top right means searching is on. Under it you can see how many watchlists are running. On the Watchlists tab, each watchlist card shows when it last matched something.
6. Around the dashboard
The tabs across the top are, from left to right:
- Alerts: new matches, newest at the top. If you keep this tab open in a browser, the alert sound plays when a new one arrives.
- Watchlists: your searches. Open one to change it, pause it or test it. Press Create Watchlist to add more, up to your plan's limit.
- Tracking: listings you are still deciding on.
- Bought, Inventory and Sold: your record of what you paid, what you still have, and what each item made when you sold it.
- Ignored: listings that were found but not alerted, with the reason, plus anything you dismissed yourself.
- Settings: account, alerts, watchlist defaults, plan and billing, password.
What to do with an alert
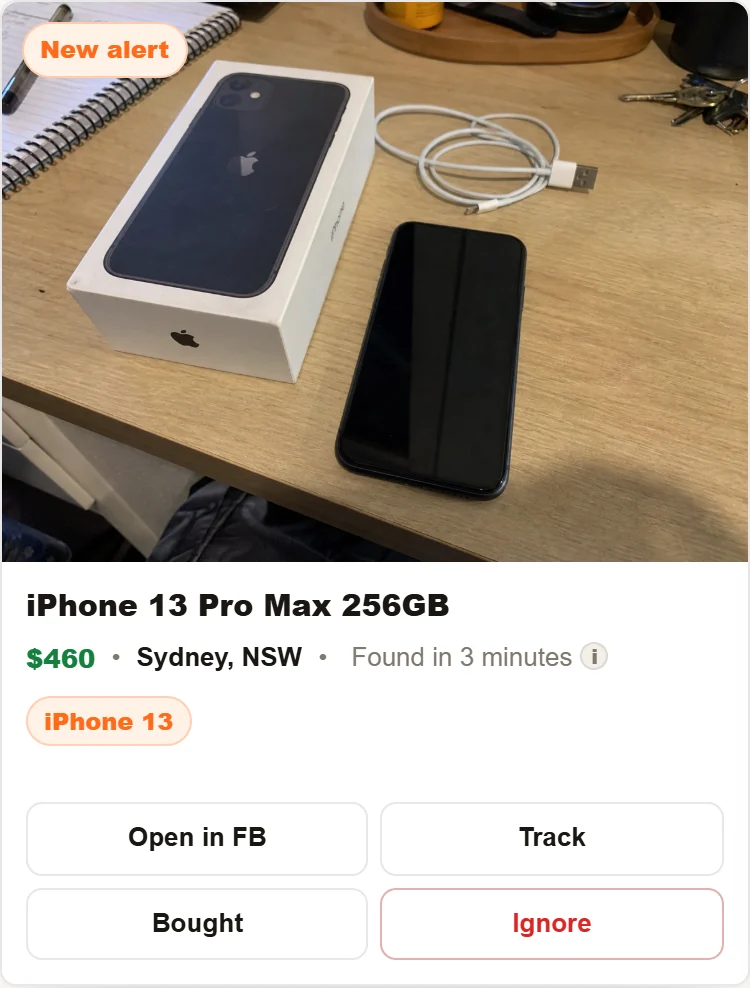
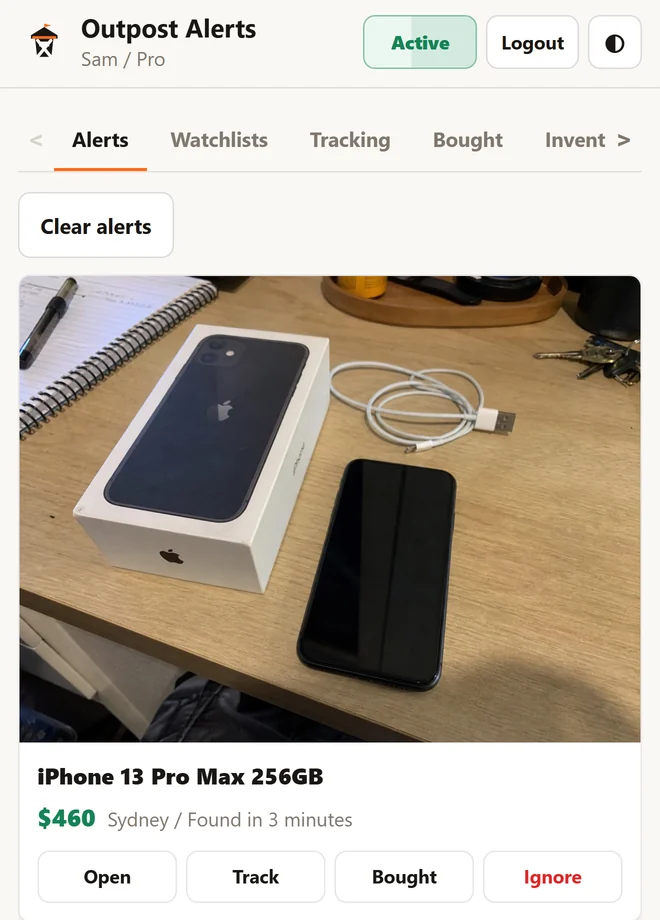
- Open in FB opens the listing on Facebook so you can message the seller. Do this first when you want the item.
- Track keeps the listing in the Tracking tab while you wait for a reply or think about it.
- Bought moves it into your Bought list and asks what you paid. It then sits in Inventory until you mark it sold.
- Ignore hides it. Over time, what you ignore teaches the check that decides what is worth alerting.
The line under the title shows the price, the location, and Found in 3 minutes: how long we took to find the listing once it appeared on Facebook. The orange chip shows which watchlist matched it.
The Ignored tab
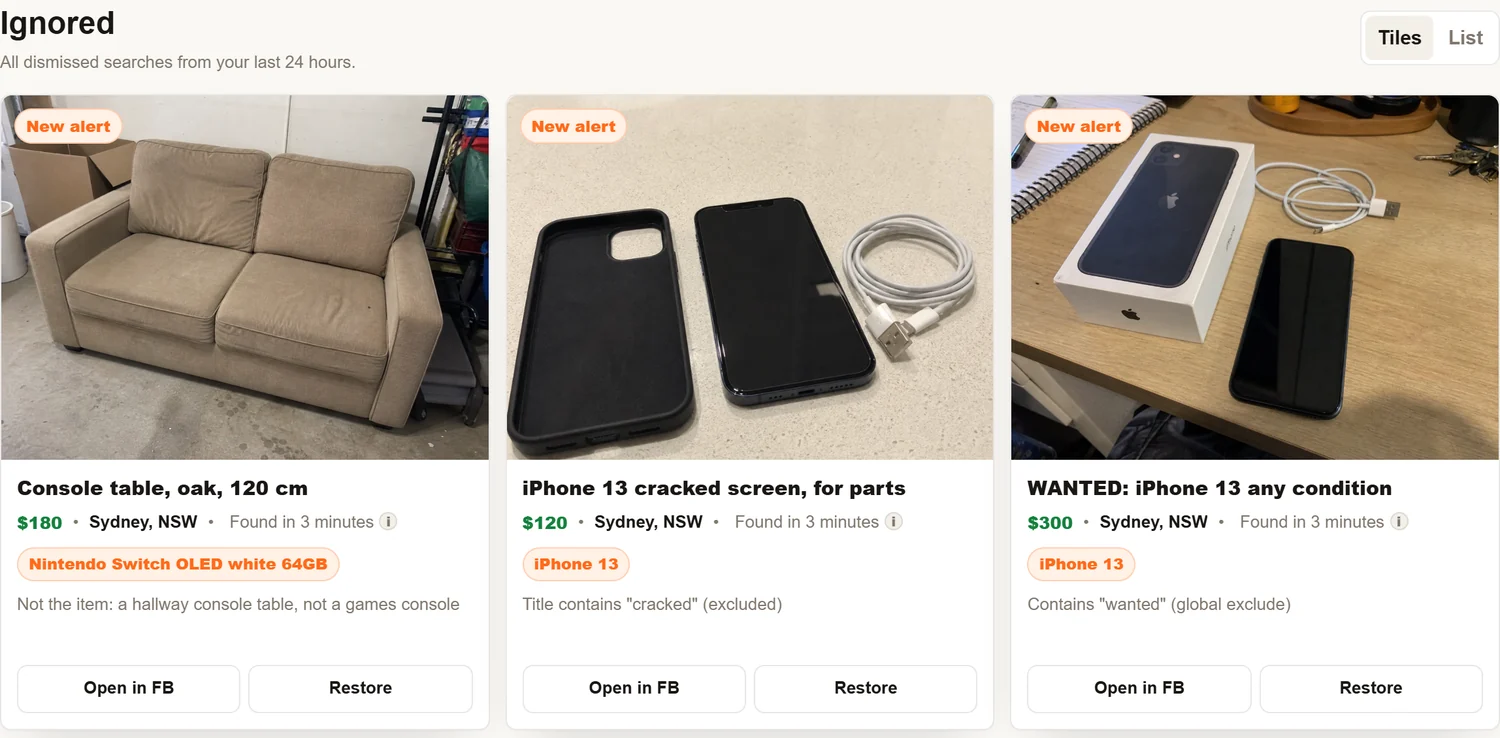
Every match is checked before it is alerted, so a watchlist for “Nintendo Switch” does not alert you to a hallway console table. Listings that fail that check, or that are caught by one of your exclude words, land in Ignored with the reason written under the title. If one is there that you actually wanted, press Restore, and see the watchlists guide for how to stop it happening again.
7. Choose where alerts go
Alerts always appear in the dashboard. To get them somewhere you will actually notice, open Settings, then Alerts.
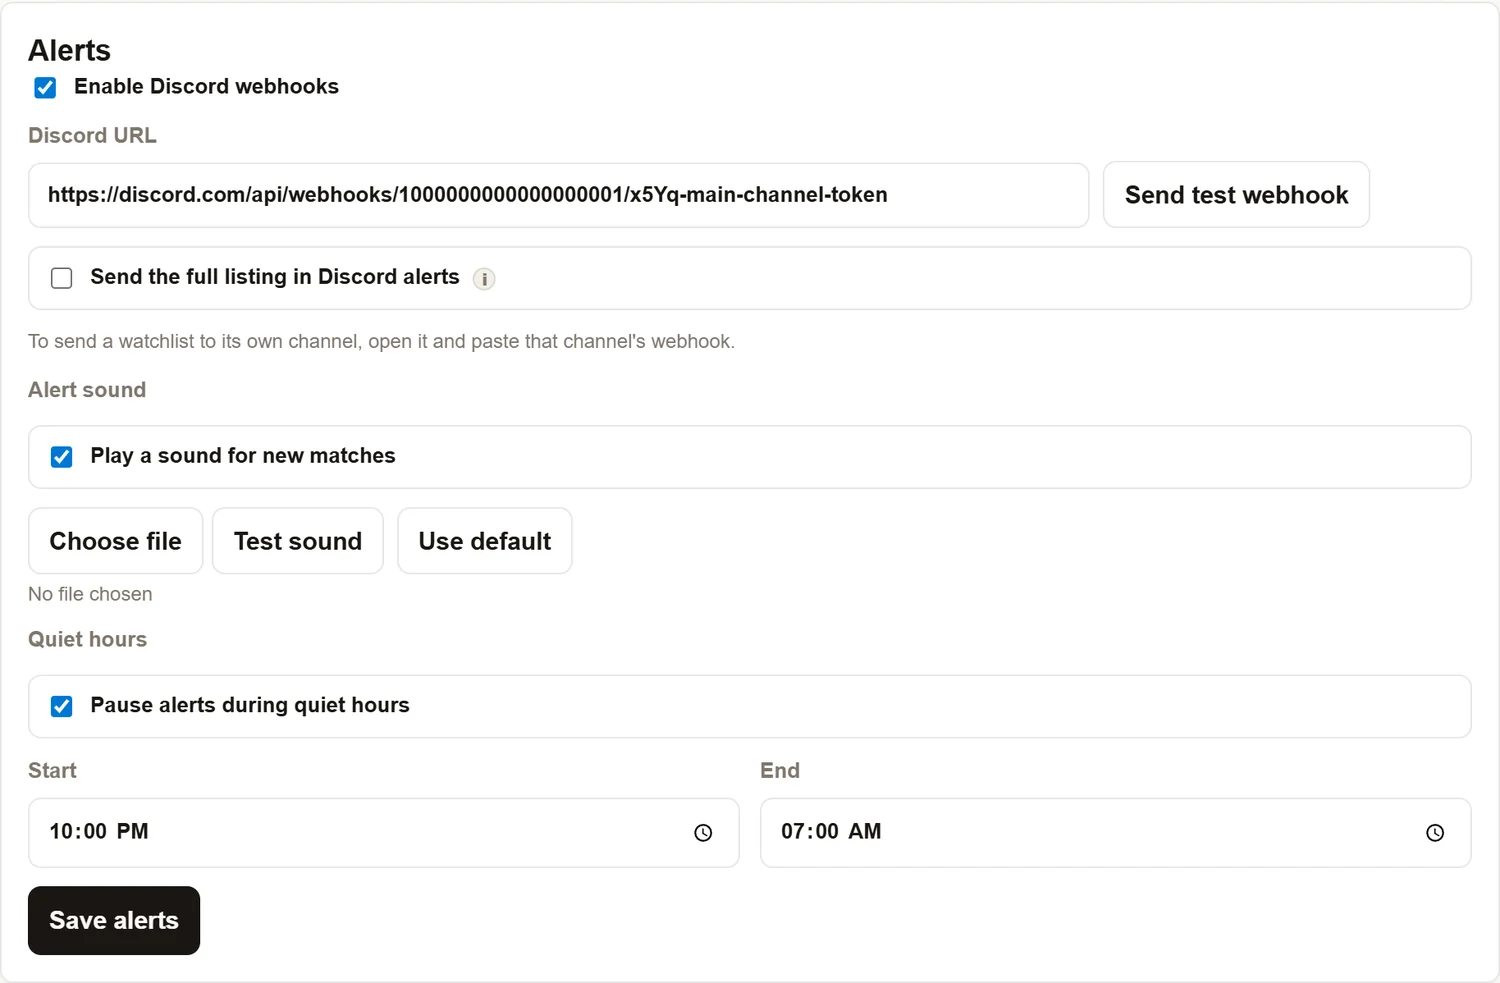
- Discord. Paste a channel's webhook URL and every alert is posted there as well. You can give any watchlist its own channel. The setup is in Sending alerts to Discord.
- Alert sound. Plays in the browser when a new alert arrives, as long as the dashboard tab is open. Press Test sound to hear it, or Choose file to use your own MP3.
- Quiet hours. Pauses searching between the two times you set, in your time zone. Listings posted during quiet hours are not sent when quiet hours end, because by then they are hours old. Only use quiet hours for times when you would never buy anyway.
On the iPhone
Alerts arrive as push notifications. If you said no when the app asked for permission, open the iPhone's Settings app, scroll to Outpost Alerts, tap Notifications, and turn Allow Notifications on. If you use Focus modes or Do Not Disturb, add Outpost Alerts to the allowed apps or you will not hear them.
On Android there is no app yet. The web dashboard works in the phone's browser, and a Discord channel with notifications turned on does the same job as push.
8. Settings worth checking
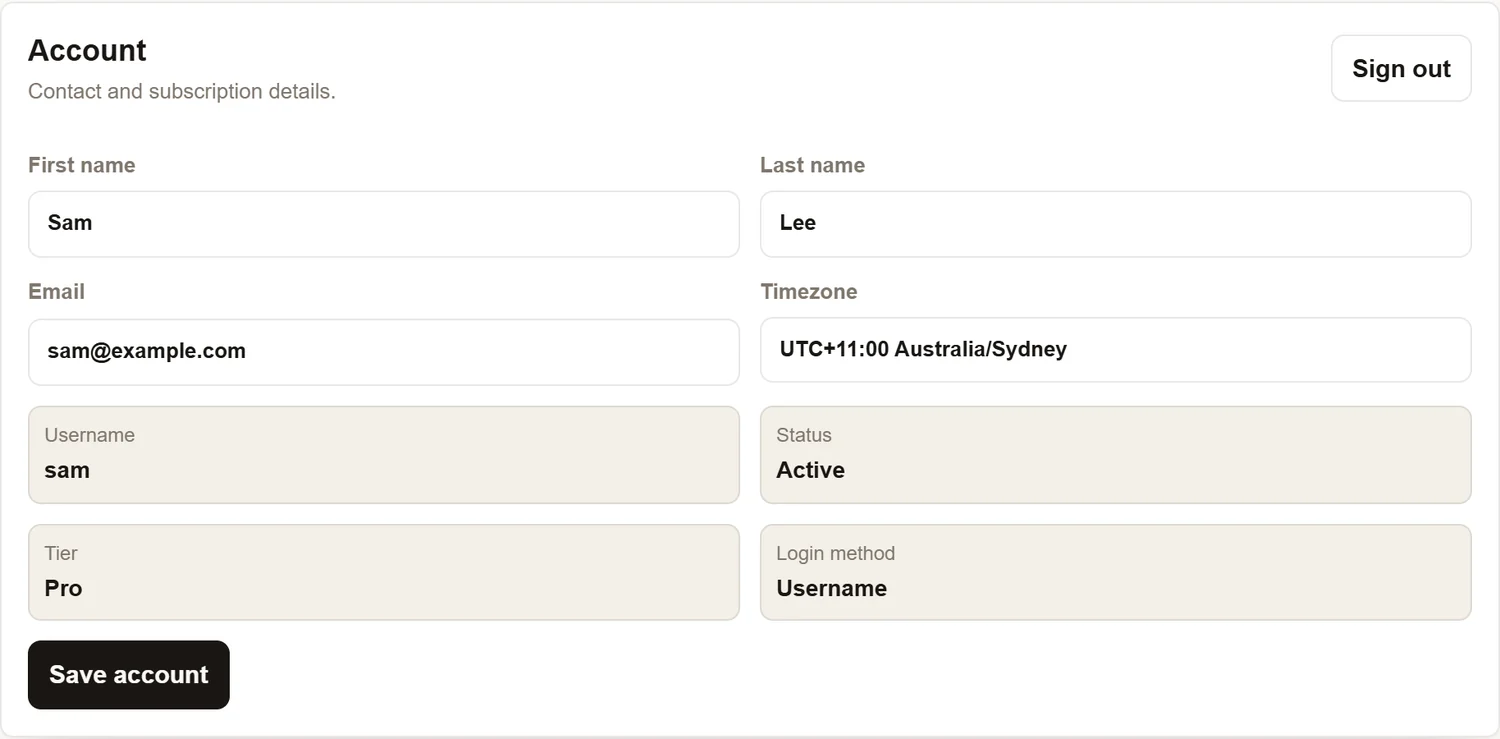
- Account: your name, email and time zone. The time zone matters: it sets quiet hours and the times shown on alerts. If it is wrong, quiet hours will fire at the wrong time of day.
- Watchlist defaults: your home suburb and whether distances show in kilometres or miles. Both are pre-filled on every new watchlist.
- Plan & billing: your current plan and billing period, with buttons to change plan or switch between monthly and yearly. Cancelling here keeps your alerts running until the end of the period you have paid for.
- Password: set or change your password. Changing it signs you out everywhere else.
- Delete dashboard: at the very bottom. This removes your account, every watchlist, all alerts, and your bought and sold history. It cannot be undone.
Common problems on day one
Open the Alerts tab. If there is a Before your outpost started section, the watchlist is working: those are listings that were already up. Live alerts arrive when someone posts a new match. We usually find it within a minute or two of it appearing on Facebook. If that section is empty too, open the Watchlists tab and read the chip on the watchlist card. Rarely listed or No matches yet with a reason means the search itself needs a change. Run Test this search to see what a week of searching finds.
The search term is too broad. “Switch” finds light switches, “Console” finds console tables. Use the product name sellers write, like “Nintendo Switch OLED”, and add words the title must not contain. Choosing the term has examples.
Add a price range, narrow the distance, or add exclude words for the variants you do not want. If a watchlist for “iPhone” is sending you every iPhone ever made, change it to the models you actually buy.
On the iPhone, check that notifications are allowed for Outpost Alerts in the iPhone's Settings, and that a Focus mode is not silencing it. If you use Discord, set the alert channel to All Messages; webhook posts do not notify you by default. See Make Discord ping your phone.
Click the link in the email we sent, or use the banner to send a new one. Check spam. If the address is wrong, fix it under Settings, then Account.
Go to Settings, then Password, and set a password. After that you can log in with your username or email as well as Google.
Common questions
Do I need to keep my computer on?
No. Outpost Alerts runs on our servers around the clock. Matches come to the web dashboard, the iPhone app and Discord, so nothing needs to stay open or switched on.
Do I need to give you my Facebook login?
No. Outpost searches Facebook Marketplace from its own servers and never asks for your Facebook account. You message sellers through Facebook as you normally would.
What happens when the trial ends?
The plan you chose starts and your card is charged. We email you the day before. If you cancel before the trial ends, nothing is charged and your alerts keep running until the trial finishes.
Can I use the web dashboard and the iPhone app together?
Yes. It is one account. Log in to either with the same details and you see the same watchlists and alerts, with push notifications on the phone and the sound in the browser.
Can I change my plan later?
Yes. On the web, go to Settings, then Plan & billing. If you bought the plan on the iPhone, change it through the iPhone's Settings app under Subscriptions, or tap Manage subscription in the app.
What does the Active chip mean?
Your outpost is searching. If it ever says something else, such as paused or stopped, the reason is shown next to it, usually a payment problem or a cancelled plan.
Ready to set up your first watchlist?
Open the dashboard, write the sentence, and press Test this search before you save. If anything in this guide does not match what you see, tell us and we will fix the guide or the product.